Hi and welcome to Episode 154 of the Photography Explained podcast. I’m your host Rick, and in each episode, I will try to explain one photographic thing to you in plain English, in less than 27 minutes (ish), without the irrelevant details. What I tell you is based on my lifetime of photographic experience. And not Google.
First – here is the answery bit
To get the exposure right every time you take a photo you need to
- Choose the right camera settings
- Compose the photo
- Take a meter reading
- Adjust the settings if needed
- Take the photo
- Check the results
- Take another photo if you have to
- Or change your composition or how your subject and the light relate to each other
Yes, it really is that simple. That is how to get the exposure correct every time you take a photo.
If only. It is not really that simple but I will explain.
You can listen to the episode here
Or keep on reading. Or do both. Entirely up to you!
And coming soon to my website – watch the video of me recording this episode!
OK – back to the podcsat episode
And I say the correct exposure, that is what we are aiming for. Not the perfect exposure, whatever that means. Just the correct exposure within the limitations of what we are trying to capture and what a camera is able to capture. As I said in the last episode, we start taking photos with a problem – a camera cannot capture the same dynamic range that we humans can see with our own eyes. So we have some work to do.
That was the answery bit. Here is the talky bit.
But first, a quick reminder – what is exposure? This is what I said in the last episode.
“Exposure in photography is the amount of light that reaches the camera sensor when taking a photo. A correctly exposed image has captured the range of light in a scene correctly. An underexposed photo is too dark, with information not recorded in the shadows. An overexposed image is too light, with information not recorded in the highlights.”
So getting the exposure right is all about capturing the right amount of light right when you are taking a photo. And as photography is drawing with light this makes sense, doesn’t it? Light levels are constantly changing, and we need to remember this.
And I am talking about getting the exposure right when you take the photo, not later on your computer. No, when we are taking photos we should
- Get the best composition that we can
- And then get the best exposure that we can for that composition with the light that is there
Get these two right and you should have a great photo. See this does not have to be complicated. Well, I say that, this can be as complicated or as simple as we want to make it, so I am going to break this down and keep things as simple as I can.
Camera settings
The camera settings will determine how your camera records the light. And it makes perfect sense that this will dictate the success or not of a photo. Digital cameras are very good at capturing light these days, which is good. And they have lots of settings.
Which camera settings you select depends on which mode you are in.
- In manual exposure mode – you set everything.
- In semi-automatic modes, you change the aperture or shutter and your camera changes things to suit.
- And in fully automatic modes the camera chooses everything.
- In manual mode, the camera takes the photo with the settings that you have selected, regardless of the correctness or not of the exposure.
- In semi-automatic modes, the camera will pick the right settings for what you have chosen.
- In fully automatic modes the camera will try to get the best exposure that it can
The main camera settings that affect the exposure are
Aperture
The aperture is the opening in the camera lens that lets the light through to the camera sensor when you take a photo. Larger aperture, smaller number, more light gets in. Smaller aperture, larger number, less light gets in. I know.
Shutter speed
Shutter speed is simply the amount of time the shutter is open exposing the camera sensor to light. Fast shutter speed, shorter time, less light gets through. Slower shutter speed, longer time, more light gets through.
ISO
The sensitivity of the camera sensor to light, or more accurately how the sensor deals with the light that reaches it, depends on what it is set at. The sensitivity of the sensor does not actually change when you change the ISO, but the brightness of the image does.
The relationship of the aperture, shutter speed and ISO is called the exposure triangle. Another one for another time.
Summary
We adjust the amount of light that gets through to the camera sensor using the aperture and the shutter. How the camera sensor processes the light depends on the ISO setting. These exposure settings determine if a photo is correctly exposed or not. I will say this more than once, incorrect exposures are not acceptable. We need to get a proper exposure with every photo that we take.
I am going to cover each of these in future episodes, here I want to stick to the how bit of getting the exposure correct, starting with the camera metering modes.
Metering Modes
We use the camera’s light meter to evaluate the light in a photo. And cameras have different metering modes. These change how the camera measures the light in a scene. I am going to cover these in a future episode. Evaluative metering is the default metering mode, certainly in the Canon ecosystem, and is a great place to start, and is what I use. It is a great all-around metering mode and is the default mode for a reason.
The other modes on my Canon 6D are
- Spot metering
- Partial Metering
- Centre-weighted average metering
So for now, let’s stick with the default metering mode, which will be evaluative mode or similar.
And that is the main camera settings relating to exposure. Many of these things you set in camera, leaving the aperture and the shutter speed as the variables when you take a photo. Talking of taking photos, back to my list in the answery bit.
Compose the photo
I know I am talking about exposure here, but I want to say that we all should take time and get the best composition that we can, and then get the best exposure for that composition. We might have to change the composition if the light is challenging, but we should start off by trying to get the photo that we want to first.
If that doesn’t work we can go to plan B for sure.
Take a meter reading
To take a meter reading for your composition press the shutter release button gently. Your camera should focus, and some stuff will appear in your viewfinder. I say stuff as it depends on your camera, and what mode you have it in.
Flashing stuff
Normally, anything that flashes needs attention. If you press the shutter release button halfway and something is flashing something normally needs sorting. This is normally exposure related. Or it could be a warning that you are using a slow shutter speed which means you need to be mindful of camera shake.
Different cameras have different flashing things – I can’t possibly cover all of them but I can say with confidence that if something is flashing you probably need to do something.
Adjust the settings if needed
If something is flashing make an adjustment until it has stopped flashing. That is flashing stuff sorted.
Overexposed photo
If the camera is showing that the image will be overexposed, the photo will be too bright. You need to reduce the amount of light getting through to the camera sensor. This can be done by choosing
A faster shutter speed
A smaller aperture
Changing to a lower ISO number
Overexposed = too much light
Underexposed photo
If the camera is showing that the image will be underexposed, the photo will be too dark. You need to increase the amount of light getting through to the camera sensor. This can be done by selecting
A slower shutter speed
A larger aperture
Changing to a higher ISO number
Adding a flash or other additional lighting
Underexposed = not enough light
If your camera warns you that highlights are being blown out, or clipped, repeat the things for the overexposed photo.Deal with those bright areas, stop the blinking.
If something flashes telling you that there is a risk of camera shake, choose a faster shutter speed.
Take the photo
The good bit. Take the photo. Enjoy this, this is the good bit.
Check the results
Have a look at the photo, either on the camera’s LCD screen, through the electronic viewfinder or on your phone if you have it connected. Obviously, if you are using a phone just erm look at your phone.
Does the image look OK? Is it too bright? Is it too dark?
On my Canon 6D I can set the camera so if the highlights are overexposed, or blown out, the affected area blinks in black. This is really handy and gives you a very quick and visual notice that something is wrong.
Check the histogram
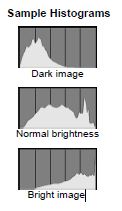
The histogram is a visual representation of the brightness of an image, and the distribution of light in the exposure. It is a scale rather strangely from 1-255, where 1 is black, and 255 is white. Although I read somewhere recently that it is 256 vertical bars. Not that this is important. What is important is that the left end is 100% black, and the right end is 100% white.
I will cover histograms in a separate episode, and this is really hard to describe, but let me try.
For a correct exposure you don’t want the column to the left to be above the baseline, nor the column to the right. If the histogram is halfway up the vertical scale on the left-hand end your photo is underexposed. And a lot underexposed. And the same at the right-hand end, but overexposed.
With a dark image there is more stuff to the left, with a bright image there is more stuff to the right, and with a correctly exposed image, or a normal brightness image, the light is more centrally and evenly distributed.
What you want is for the graph to start to rise somewhere to the right of the left-hand end, and to drop down to the baseline before the right-hand end of the scale.
Like I say. not easy to describe. Check out the blog post for the episode where I have added a picture from the Canon 6D manual. But you will find the histogram somewhere on most modern cameras, well you should know this as you have read the camera manual right?
So three things that tell you if you have a correct exposure or not.
- Photo too bright or too dark
- Blinky things
- Histogram too high on one end or the other
If you have the correct exposure great, job done, and move on.
If you have not got the correct exposure, make an adjustment and take it again.
The photo is too dark, underexposed.
More light is needed. Pick a slower shutter speed, leaving the camera sensor exposed to light for longer, or choose a larger aperture, (smaller aperture value). Or alternatively choose a higher ISO value, which increases the brightness of the image capture.
The photo is too light and overexposed.
Less light is required. Pick a faster shutter speed, leaving the camera sensor exposed to light for less time, or choose a smaller aperture, (larger aperture value). Or alternatively choose a lower ISO value, which reduces the brightness of the image capture.
Take another photo and have another look
If the image looks OK then great, if not repeat as above.
What if I am using a fully automatic mode?
With my Canon 6D, that is it. In the fully automatic modes, the camera is doing all the work for you. Apart from in Program Mode, where you can use exposure compensation. And this is why if you are looking to get into photography seriously you will quickly move away from the fully automatic modes.
Exposure compensation?
Exposure compensation is a quick way of increasing or reducing the brightness of a photo. On my Canon 6D, you can use it in P for program (not P for Professional), Av and TV. Ad lib.
You change the brightness by turning the wheel on the back of the camera.
I have a full episode on exposure compensation – I might have to ditch that one though as that is pushing it for a whole episode! But check it out as it is ace and I use it all the time.
AE Lock
On my Canon 6D, I can use AE lock to lock the exposure and then I can move the camera, focus and take a shot with the exposure locked.
RAW or JEPG?
RAW files are RAW files. There is no processing done to them. JPEG files have processing done to them in-camera. Now I use RAW for all my photos, as I want to record the maximum amount of data when I take a photo and make decisions about processing myself. JPEG files are already processed, and you need to work out which is best for you when it comes to the photos that you take and the success or not of the exposure. I feel that I get more data and more latitude shooting in RAW which helps me to get the best exposures that I can. Some might disagree with this.
And there we have it. This is, in a nutshell, putting everything else to one side and concentrating on the fundamentals, how you get the correct exposure.
But there’s a little bit more. That was just the beginning, the technical side. The numbers and the settings. How your camera captures and records the light. But we as photographers have a hand in this as well.
You can get better exposures by thinking about the composition, arranging the elements in a composition and using the light effectively to get the right exposure. A little bit of thought can get you from massive problems with exposure to a correctly exposed photo.
Let me give you a couple of examples.
If you are photographing someone on a sunny day, and you have the sun right behind your subject, you are probably going to struggle to get the correct exposure. Think about your composition, and how your subject and the light relate to each other. Don’t try to capture more than your camera is able to capture, this just does not work. Change your viewpoint, or move the subject, so the range of lights and darks is less.
Or in this instance add flash to balance out the light.
I quite often have to photograph steel columns with a bright sky behind them. Now I know that I can’t get a correct exposure in a single image capture as the steel is dark and the sky is bright, so I have to do something different.
I use auto-bracketing. I take three photos, one with the correct exposure, one photo two stops underexposed and one photo two stops overexposed. I merge these three photos together in Lightroom. And this is massive for me and works pretty much every time. I will do a full episode on this, which is such a fundamental technique that I use when I am taking photos of buildings.
Practise
Whatever you do, however you take your photos, there is no substitute for practice. And I am talking here about getting the best exposure that you can, in camera, every time. This does not happen immediately, and the results will vary with the lighting conditions, subject matter, and how all this stuff hangs together, but practise, practise, practise, until you know how to get the best exposure that you can for every photo in every situation.
Right – talky bit over – what if I use a phone and not a camera?
I use an iPhone. Using the default camera app, get the composition that you want, touch the screen and the AE/ AF lock appears on the screen. Move it where you want it to be and take the photo. And you can also from there adjust the brightness by touching the sun icon to the right and sliding up for brighter and down for less bright.
Simple eh? And this can turn a bad photo into a really good, and of course well-exposed photo.
And as for phones other than iPhones, sorry no idea but the principles are the same whatever you are taking photos with.
What if I use a film camera?
You have to pretty much get it right the first time. There is no checking what you have with film cameras, changing a setting and taking another photo. You might want to take more than one photo with different settings if there is a concern, but you will not know until you get the processed film back if you got it right or not.
Now as horrendous as that sounds practice and experience help massively to get the right exposure when shooting with film.
What do I do?
Same as the last episode, but no harm in going over this again.
- I put my DSLR camera on a tripod, so I have automatically removed any issues with the shutter speed settings, and do not need to worry about camera shake.
- I set the lowest ISO that I can, which is normally 100. I rarely change the ISO setting.
- I shoot in RAW
- I use AV Mode, also known as aperture priority mode. I choose the aperture and the camera chooses the shutter speed. I can’t remember when I last used shutter priority mode.
- The aperture setting I use is normally F8
- I use auto bracketing
- I focus, meter and then press the shutter button. The camera takes three photos using auto bracketing. The camera chooses the shutter speeds for the three exposures.
- I merge each set of three photos together in Lightroom to give me one photo to edit.
That is what I do.
And a word on this episode – what happened?
Well, delighted to finally get this out. Basically, my computer had a moment and I had to delete a load of stuff, change some settings and give my PC a boost, quite literally, with something called Readyboost. Just over a tenner for a huge increase in performance.
I recorded the last episode and there was lots of bad digital stuff, so bad that I could not publish the episode. I spent ages trying to fix the software, did re-records which were no better, and tried all sorts of stuff. And it just turned out that my computer, all of a sudden, and for no reason that I know of, could not record the audio.
Anyway all fixed now and I am back on it.
Some thoughts from the last episode
Well, the last episode was all about what exposure is, this episode was the how to get the right exposure. Worth saying again that this is something that we all need to learn and understand, it is so fundamental to photography. It is after all about capturing the correct amount of light, the right range of brightness, to correctly photograph a scene.
Next episode
Episode 155 – well it was going to be “How do I get the correct exposure with my camera phone?”. But I changed my mind. I have covered that quickly in this episode. No, in the next episode, I am going to talk all about aperture. Just that, and no more. Photography Explained Podcast Episode 155 – What Is Aperture In Photography?
I have never looked at aperture on its own, and am looking forward to doing this. And no, I have not written this episode yet.
If you have a question you would like me to answer just head over to PhotographyExplainedPodcast.com/start where you can find out what to do. Or just say hi. It would be lovely to hear from you.
That’s all.
This episode was brought to you by, erm, for a change, a cheese and pickle sandwich and a bag of salt and vinegar crisps all washed down with a nice cold Diet Pepsi, all consumed before I settled down in my homemade, acoustically cushioned recording emporium. Today’s acoustic treatment is two pillows, three fleeces and a cushion.
I’ve been Rick McEvoy, thanks again very much for listening to my small but perfectly formed podcast (it says here), and for giving me 27 ish minutes of your valuable time. I think that this episode will be 28 minutes long after I have edited out the rubbish.
Take care, stay safe
Cheers from me Rick
OK – that was the podcast episode.
Want to know more?
Head over to the Start page on the Photography Explained Podcast website to find out more.
And here is the list of episodes published to date – you can listen to any episode straight from this page which is nice.
Let me know if there is a photography thing that you want me to explain and I will add it to my list. Just head over to the This is my list of things to explain page of this website to see what is on there already.
Let me send you stuff
I send out a weekly email to my subscribers. It is my take on one photography thing, plus what I have been writing and talking about. Just fill in the box and you can get my weekly photographic musings straight to your inbox. Which is nice.
And finally a little bit about me
Finally, yes this paragraph is all about me – check out my Rick McEvoy Photography website to find out more about me and my architectural, construction, real estate and travel photography work. I also write about general photography stuff, all in plain English without the irrelevant detail.
Thank you
Thanks for listening to my podcast (if you did) and reading this blog post (which I assume you have done as you are reading this).
Cheers from me Rick
